Netgear WiFi Extender Setup: A Proper Guide
There are several ways to connect the Netgear WiFi extender with the home router which will boost its signals. Those Netgear WiFi extender setup methods are: mywifiext.net (manual method), WPS (WiFi protected setup), Nighthawk app (via phone).
We will explain every method one by one thoroughly. Then next, we provide you with the Netgear nighthawk extender setup common issues and solutions.
Netgear Extender Setup: Mywifiext.net (Manual)
It is most advisable method from the WiFi experts to set the WiFi extender up with the home router.
- Open your computer and connect with the Netgear_ext network via WiFi.
- Go into any web browser and enter mywifiext.net or IP address 192.168.1.250.
- Press ENTER to search and a login page will appear on the web browser.
- The page will ask for the Nighthawk admin default login username and password.
- The default credentials are given at the Nighthawk extender back label or in the user manual.
Note: If you don’t open the Netgear WiFi extender setup page yet, you need to create a Netgear account by entering a few details. Type details like Email ID, password, answer two security questions and click Register button.
- The Mywifiext login interface will open up, here the host router’s network will be searched.
- Select the router network and enter its password to connect each other.
- Then, you need to create the extended network by entering new username and password.
Manage all settings according to your house area like manage the extender frequency, change the admin login password, change network password etc.
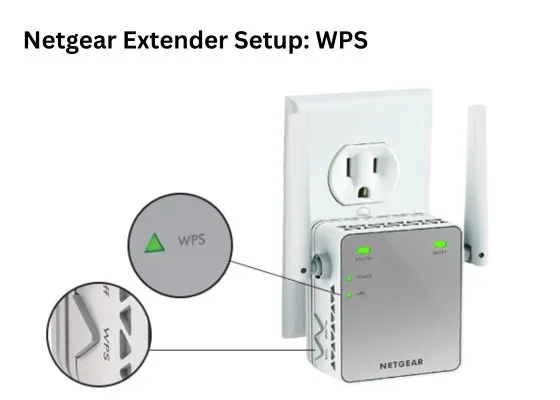
Netgear Extender Setup: WPS (WiFi Protected Setup)
The easiest method of all to connect the extender with your router is WPS (WiFi protected setup). In this connection method, the user needs to just press a button and wait for a few minutes. Let’s have a close look at the WPS connection instructions:
- Just plug the extender near to the WiFi router and power it on.
- Now, find and press the WPS button on the extender and router.
- The extender will start to blink a green light on the WPS LED.
- It will turn to solid which means the extender is connected with the router.
Now, the extender is set on a network and can accessible through the router’s SSID password. But you can also create a separate network of the extender.
Netgear Extender Setup: Nighthawk App (Phone)
This section will provide you steps to the set your Netgear Nighthawk extender up via your phone using the Nighthawk app. So first, download the app from the Play Store or App Store or Netgear Support site. Then, apply these steps one by one.
- Open the app and create the Netgear account with the help of your Email address.
- Select the Set Up New Device option. Choose the Range Extender.
- Plug your extender into any power outlet and turn it on.
- The app will instruct you to connect with the extender network (Netgear_EXT).
- Then, on the next page, you have to select the router’s network and enter its password.
- On next page, enter new extender SSID credentials like username and password to create a separate network.
After that, finish the Netgear WiFi extender setup and reboot the device to connect with the extended internet network.
So, these were the three methods to complete the Netgear Nighthawk extender setup. But you should also learn troubleshooting tips and solutions to make the setup error free.
Nighthawk WiFi Extender Setup Common Issues and Solutions
Mywifiext Not Working
- The biggest reason why your mywifiext not working is computer not linked with the extender network. To resolve, you should check the computer/laptop connected with the Netgear_ext.
- Also, disable the browser’s ad-blocker & computer’s Antivirus just while accessing the mywifiext wizard.
- Reboot the Netgear Nighthawk extender network by turning it on and off once.
Netgear Nighthawk Extender Not Working
- You should check the power is supplied to the extender and getting the proper electricity. Check there is no damage on the wall socket.
- Reconnect the WiFi extender with the router’s network via WPS or interface or nighthawk app.
-
Press the reset button, hold it for 10 seconds. After a few minutes, the extender’s data will be deleted, then you need to reconfigure the device.
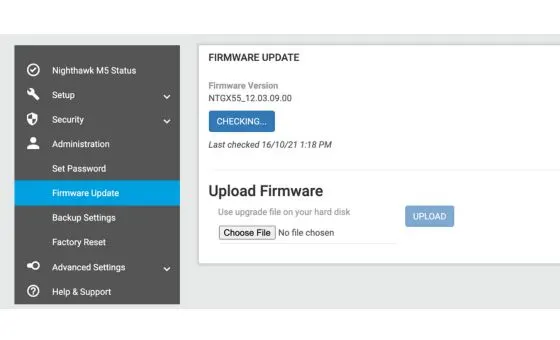
Extender Firmware Update
You must update your extender whenever the Netgear launches new one for your extender model. This section you will learn how to update the extender firmware.
- Visit the Netgear support website and download the latest firmware version for your extender model.
- Now, access the Netgear Nighthawk extender setup page on your computer using the admin credentials.
- Go into the firmware tab and paste the new version file here, then click INSTAL Button.
- After a few minutes, the device will reboot itself to update the extender, then you can reconnect the network.
Extender to Router Connectivity Issues
- The router to extender connection established through the WPS, Ethernet cable, mywifiext, nighthawk app. But, if there is any problem, you should make sure the extender is in the reach of the router.
-
Reconnect the extender with the router via WPS and configure it according to your house area.
Reset and Reconfigure to Deal with Multiple Issues
When your WiFi extender faces multiple issues and no solution is working, it is time to reset the device and reconfigure it to resolve every issues.
Reset
You have to look for a pinhole at the side panel of the extender. Use a pin or pen to press and hold it for 8-10 seconds. The reset process starts and will end in a few minutes. Then, you need to reconfigure the WiFi extender through the interface.
Reconfiguration
You should use the manual method to reconfigure. Just apply these instructions to access the Netgear Nighthawk extender setup page:
- Connect with the extender Netgear_ext
- Go to the mywifiext.net or mywifiext.local or IP 192.168.1.250.
- Enter the Netgear account details like Email ID and password.
- You will get into the interface, here select the router network.
- Enter the password to connect extender with the router.
- Now, on the next page you have to enter new SSID credentials for the extended network.
- Next the interface will present you with other settings like 5GHz network, updates and other.
- After managing all, finish the Netgear WiFi extender setup the extender will reboot to apply the settings.
Frequently Asked Questions
Link your computer with the extender network. Go to the mywifiext.net or mywifiext.local or IP 192.168.1.250. Enter the Netgear account details like Email ID and password. Then you will access the device.
- Look for a pin hole at the side panel of the extender.
- Use a pin or pen to press and hold it for 8-10 seconds.
- The reset process starts and will end in a few minutes
You must choose the spot inside the router’s network and halfway from the dead internet zone in your house.
There can be several reasons like:
- Outdated firmware version
- Router to extender connectivity issue
- The Netgear extender didn’t get any power supply
- Need a reset to resolve the glitch.
Access the extender interface through the Mywifiext and go into the Wireless settings. select any of the 5GHz or 2.4GHz, enter the WiFi username and password. Save the settings.