Netgear Nighthawk MK63 Setup: WiFi 6 System
This tutorial will help you with that.
We are not Netgear. We’re the third-party people who have used these systems, run into strange problems, and worked out what really works. This way, you don’t have to spend hours looking through forums or watching three-year-old YouTube videos.
Let’s go over all the numerous ways you can set it up, how to change settings other than the “default settings,” and how to repair things when they stop functioning.
Netgear Nighthawk MK63 Setup Methods
Here are the methods you can use to setup your device, but before the setup. Let us have a look at all the components you need to keep in place:
What You’ll Need to Get Started
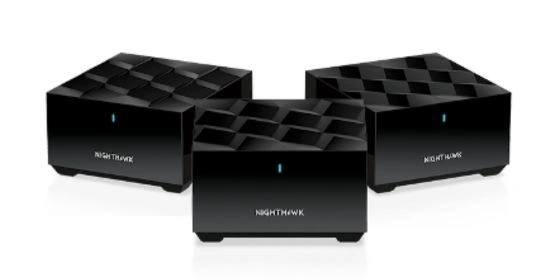
- The primary MK63 router, which features a yellow ethernet port
- The two satellites (they appear nearly the same; they don’t have ethernet connectors)
- Your modem is already on
- A phone or tablet with Nighthawk app installed
METHOD 1: Setting Up with the Nighthawk App
This is the way that most people employ. Here’s how to accomplish it step by step. Follow the steps given below:
1. Connect the modem to the router
- Connect the main router device to a power source.
- Use the ethernet wire that came with it to connect it to your modem. Plug it in the yellow port on the rear.
- Let it start up. When the LED glows pure white, you’ll know it’s ready.
This might sometimes take a little longer than you think. Give it two to three minutes.
2. Turn on the satellites
- Place the satellites in a room that is no more than two rooms away from the main router.
- Power source the satellites.
- Wait for the light to start pulsating white. That indicates a connection attempt.
**Tip: Place satellites close together while setting them up. Once everything is in sync, you can move them.
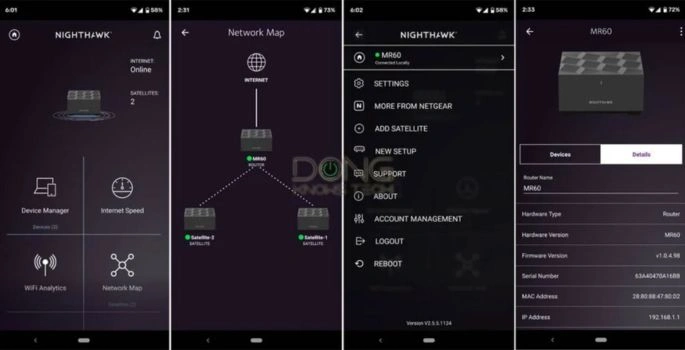
3. Open Nighthawk after downloading
- Download the app from App Store or Play Store as per your device; iOS or Android.
- First-time app users must open a Netgear account. But if you already have a Netgear account, log into that.
- Click “Set Up a New System.”
- Choose Nighthawk Mesh from the list.
- Pay close attention to the on-screen instructions. They will help you find the router, name your WiFi, create a password, and add satellites.
4. Allow it to update
- The app will conduct a firmware upgrade once everything is online.
- This stage might take 5 to 10 minutes. Don’t take anything out.
- Ensure all equipment, including routers and satellites, have steady white lights after you are done with the Netgear Nighthawk MK63 setup.
If the programme freezes, force-shut down and reopen it. Never remove the device when pairing; it will disrupt it.
5. Give it a try
- Link your laptop or phone to the new WiFi network you just set up.
- Do a fast speed test or watch anything on YouTube.
- You’re ready to go if everything seems right.
Don’t worry if the program doesn’t find your router at any time. There are various methods to get it ready.
METHOD 2: Setting up with a web browser
Phones behave strangely at times. Here is how you can do the Netgear Nighthawk MK63 Setup via browser in such cases.
- Connect everything and plug it in as you did previously.
- Just as with the app technique, connect the router to the modem and turn everything on.
- Connect your laptop to the router’s WiFi network
Find the default network name on the label that is on the router. Then, use your laptop or desktop to connect to it.
- Launch a web browser and go to: 192.168.1.1 or routerlogin.net
- Use the default login Most of the time:
- Name: admin
- Password: password
- Then, you’ll have to use a browser-based setup wizard:
- Select a WiFi name and password.
- Configure internet settings (DHCP or PPPoE, depending on ISP)
- Complete the settings and use them
If you need to, you may also sync satellites by hand from here.
METHOD 3: Setting up with wires (Ethernet backhaul)
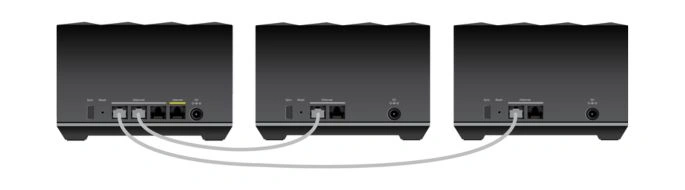
Want to make the link between units more stable? This is how to set up Ethernet backhaul:
- First, set up the app or browser
- Before you move to wired option, you still need to get the complete system to work.
- Once it’s operating, connect Ethernet cords from the router to each satellite.
- Only use LAN-to-LAN ports.
After connecting:
- The mesh will immediately switch to the wired connection for backhaul.
- WiFi will still be available, but faster and less interrupted.
METHOD 4: Manually syncing more satellites
Here’s how to add new satellites without resetting everything if you’ve acquired them later:
- Put the new satellite close to the router.
- For two seconds, press and hold the Sync button on the back of the router.
- Press the Sync button on the new satellite within two minutes.
- Wait until the light is a solid white color. Then you can see its whole connection.
What if it doesn’t work?
It really does happen. Give this a shot:
- The app won’t display the router? Turn your phone off and on again. Disable mobile data. Give it another shot.
- The satellite is stuck on a blinking white light? For now, bring it closer to the router. Resync.
- Did the Netgear Nighthawk MK63 setup freeze? Unplug everything, wait 30 seconds, plug everything back in, and restart the programme.
Nighthawk MK63 Setup: Beyond the Defaults
You can make a number of changes to achieve greater control, speed, and security once it is up and running.
Parental Controls
- You can find it under the app’s “Settings.”
- It allows you to stop the internet on certain gadgets.
- Set times for the internet to be off, such when kids go to bed.
Network for Guests
- Simple to make from the app.
- Prevents visitors from accessing your principal network, ensuring device priorities remain intact.
Quality of Service Settings (QoS)
- Give some devices, such game consoles, business laptops, or a desktop that takes up a lot of bandwidth, higher priority.
- To configure, choose “Advanced” on the online dashboard.
What if it doesn’t work?
Let’s be honest: things go wrong even with a clever Nighthawk mesh setup. Here’s how to deal with the most prevalent problems.
The Internet Light Is Orange or Off
- Make sure your modem is functional. Try plugging a laptop straight into it.
- Restart the router and modem.
- Still nothing? Try a different port or re-seat the Ethernet wire.
Satellites aren’t linking up
- For a short while, move them closer to the router.
- Press and hold the Sync button one more.
- If that fails, reset the satellite to factory settings by pressing the reset hole with a pin for 10 seconds.
The Nighthawk App Can’t Find the System
- While setting up, turn off mobile data. It might cause problems at times.
- Turn off your phone and router and then back on.
- Use your browser to log in at 192.168.1.1
WiFi Drops on Some Devices
- If you have advanced settings, try splitting the 2.4GHz and 5GHz bands.
- Turn off Smart Connect for a short time to test.
- Use the app to update the firmware.
A Quick Summary for People Who Like to Scroll
- Nighthawk AX1800 setup is a three-piece Nighthawk mesh setup that is fast, stable, and easy to use.
- Although the app is the most convenient method to set things up, you can also do it by utilizing a web browser or a wired connection when you do it.
- There are a number of options that may be altered, including parental limits, guest networks, and quality of service (QoS).
- In the majority of cases, troubleshooting consists of nothing more than a simple question of distance, interference, and a good old-fashioned reboot.
- It has a degree of adaptability, although you will need to experiment with it on occasion.